2020年11月25日水曜日


2020年10月29日木曜日
釣り1、サビキ釣り
釣り1、サビキ釣り
鬼滅の刃の大ブーム中、「水の呼吸」を理解できないオジサンは全集中して釣りが始まりました。😅

サビキ釣りは初心者の入門編で、続々釣り上げるのはサビキ釣りの楽しみです。
まず、成果を挙げます。
サバなど


↓出典:http://www.tsurisoku.com/news/2017/04/28/609/
タックル&仕掛け
リール付きの竿なら何でもOKだが、3m前後の波止竿が扱いやすい。仕掛けは市販のサビキ5~7号。アミカゴはオモリ内蔵の10~15号。オモリに合った飛ばしウキも持参しておこう。
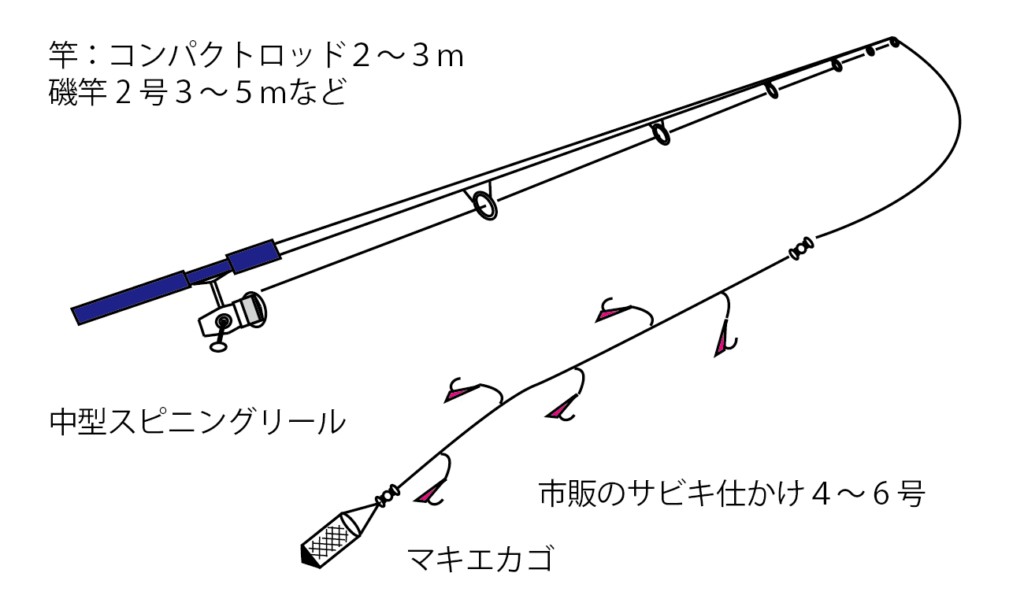
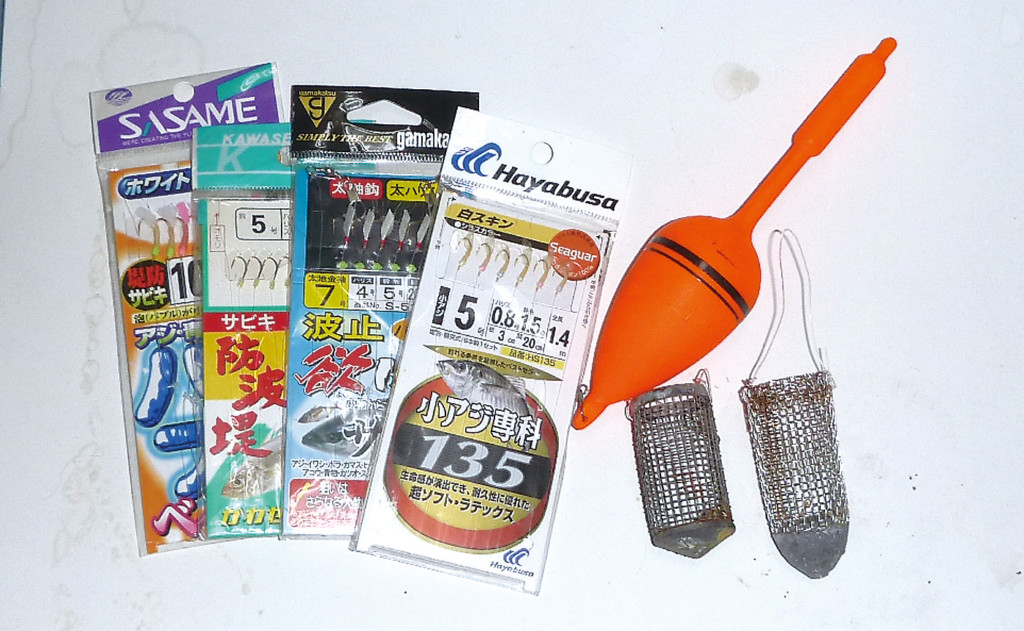
サビキ仕掛けは針の大きさや装飾が異なる物を数種類用意しておき、当日の食いに応じて使い分けよう
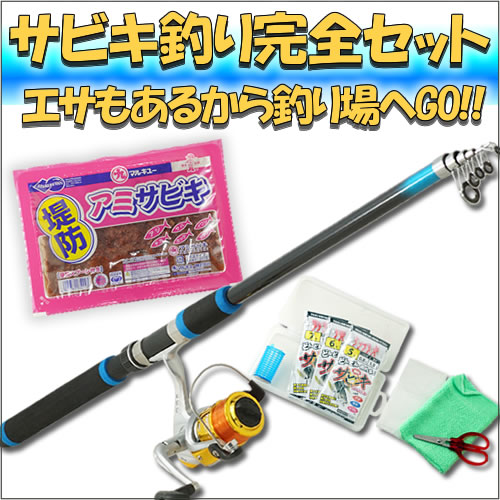
釣具店には、仕かけまですべてがセットになったサビキ竿が売っているので、初めてならそれを購入するのがよい。
 出典:フィッシング遊
エサ
エサはアミエビを使う。釣具店のエサコーナーへ行けば、冷凍されている物や常温タイプの物までいろんなエサが置いている。
 出典:HAMAICHI
また、アジパワー(マルキユー)などの集魚材をアミエビにまぜたり、堤防まきえ(マルキユー)などの配合エサを投入することで、より長く魚をその場にとどまらせておく効果が期待できる。
必要なアイテム
上記タックルや仕掛け以外に必要なアイテムは以下の通り。
- ライフジャケット
- 水汲みバケツ
- クーラー
- 氷
- ハサミ
- プライヤー
- 帽子
- タオル
- 魚バサミ(フィッシュグリップ)
- アミエビバケツ
 出典:プロックス 水汲みバケツ
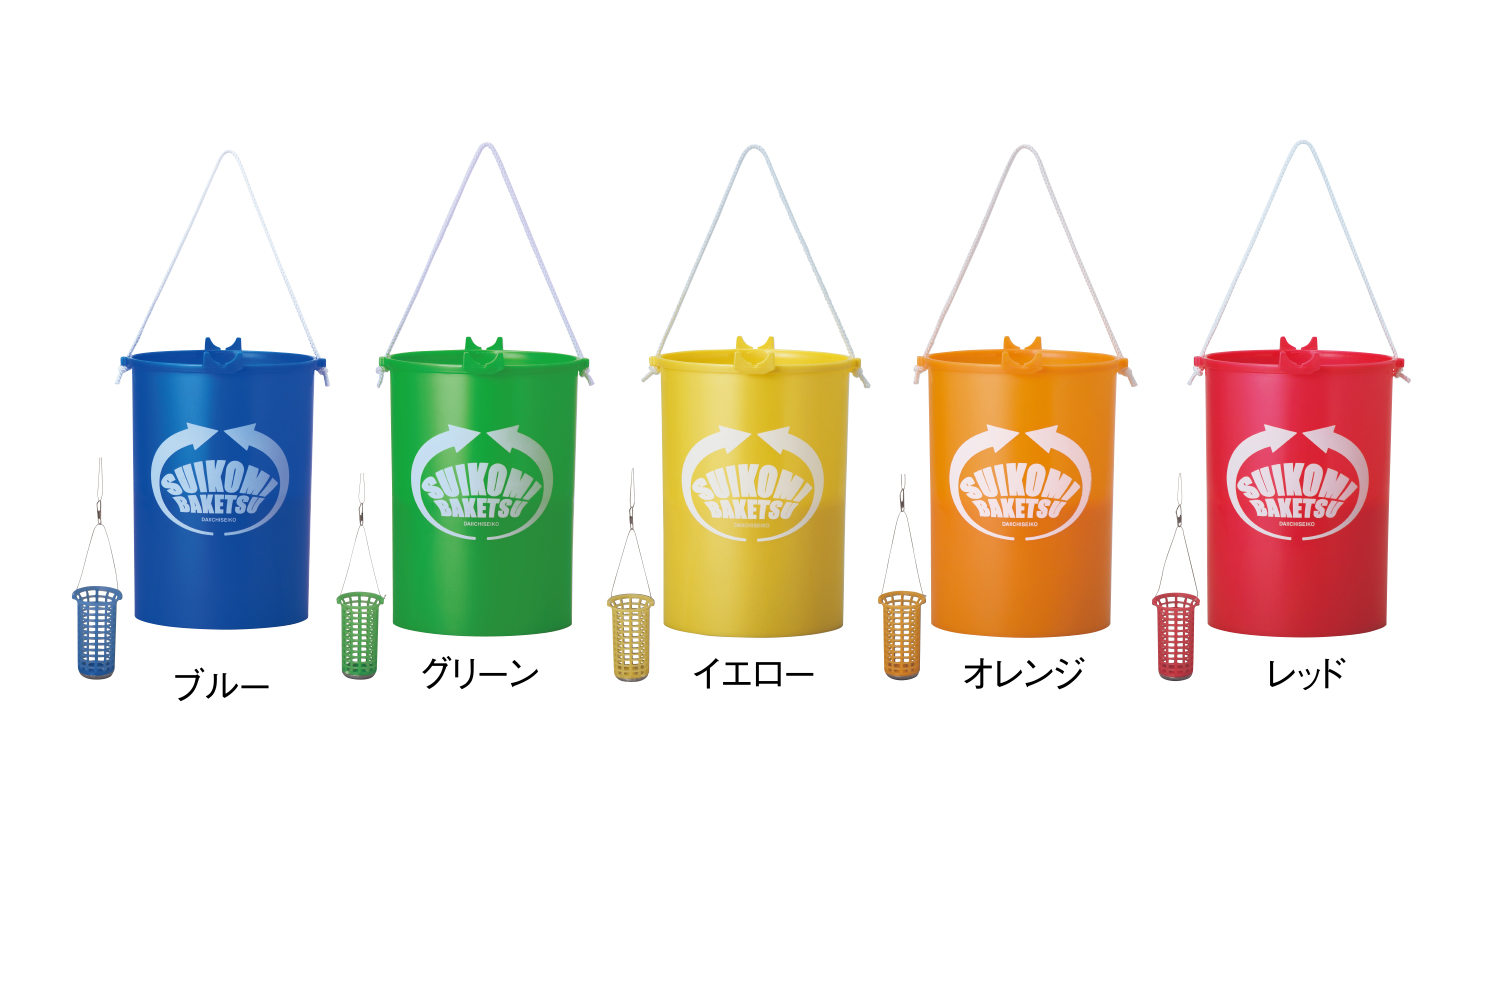

狙いどころ
波止では竿下に仕かけを下ろして狙う人が多い。朝夕まずめや魚影の濃い時なら、竿下狙いだけで十分。ただ、ポイントにもよるが、日中は竿下まで寄ってこない場合もある。そんな時は仕かけに飛ばしウキをセットして、少し沖を狙ってみよう。周りが釣れていなくても、入れ食いになることがあるぞ。
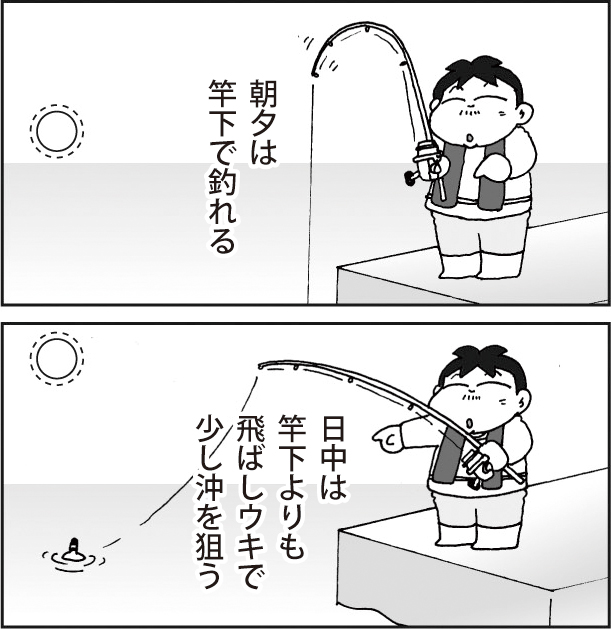
また狙うタナは基本的に底周辺でよいが、活性が上がると上のほうまで浮いてくるので、状況次第では底まで下ろす必要はない。アジ、イワシ、サバなどがごちゃまぜで釣れることも多いが、アジは比較的底のタナなので、重めのオモリカゴを付けて底まで速く下ろすと、アジが釣れる確率が上がるぞ。

釣り方
サビキ釣りの手順は以下の通り。
- アミエビをカゴに詰めて底へ落とす
- 着底すれば竿を上下に動かしてマキエを出し、少し止めてアタリを待つ
- アタリがなければ、またマキエを出して待つ
- 2~3回マキエを出すとエサがなくなるので、手返しする
- アタリがあれば、竿を立ててリールを巻き始める
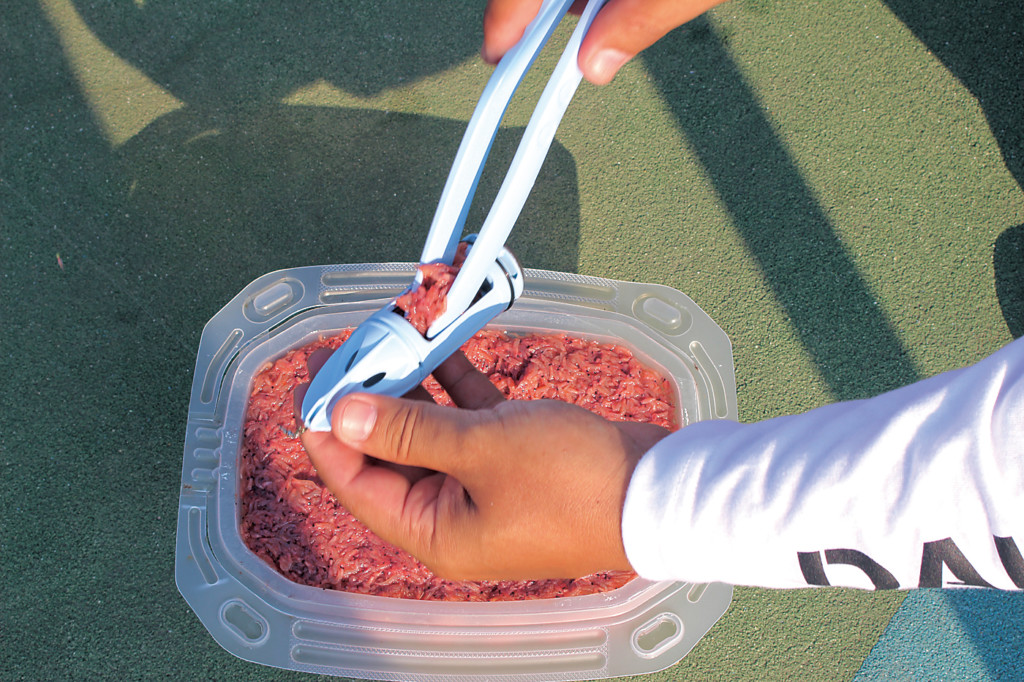
マキエカゴにアミエビを詰める
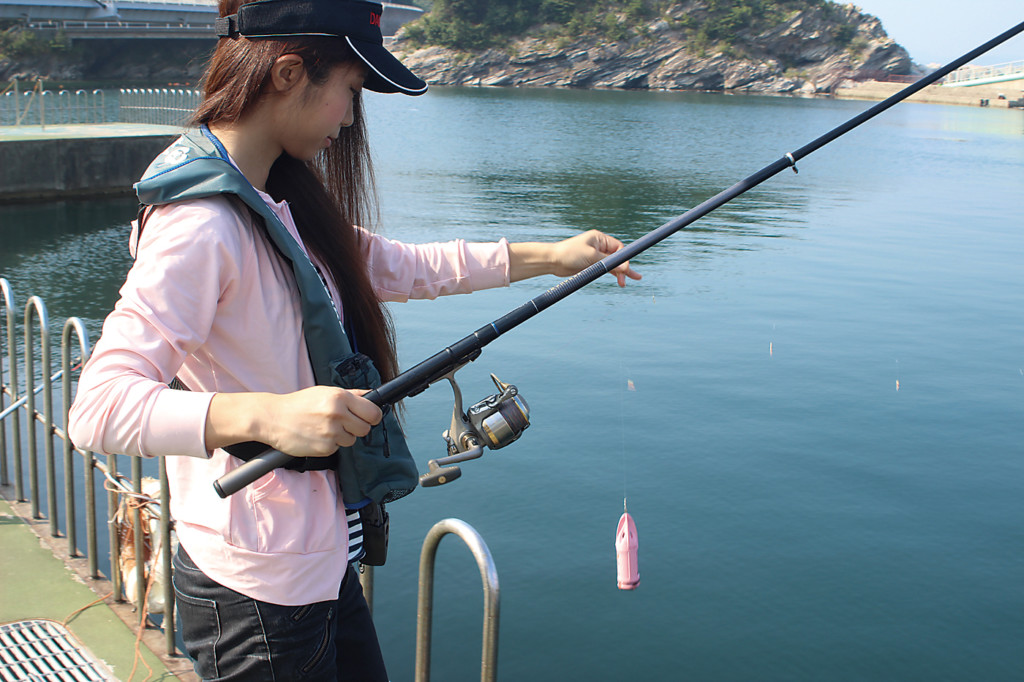
仕掛けを海中へ沈める
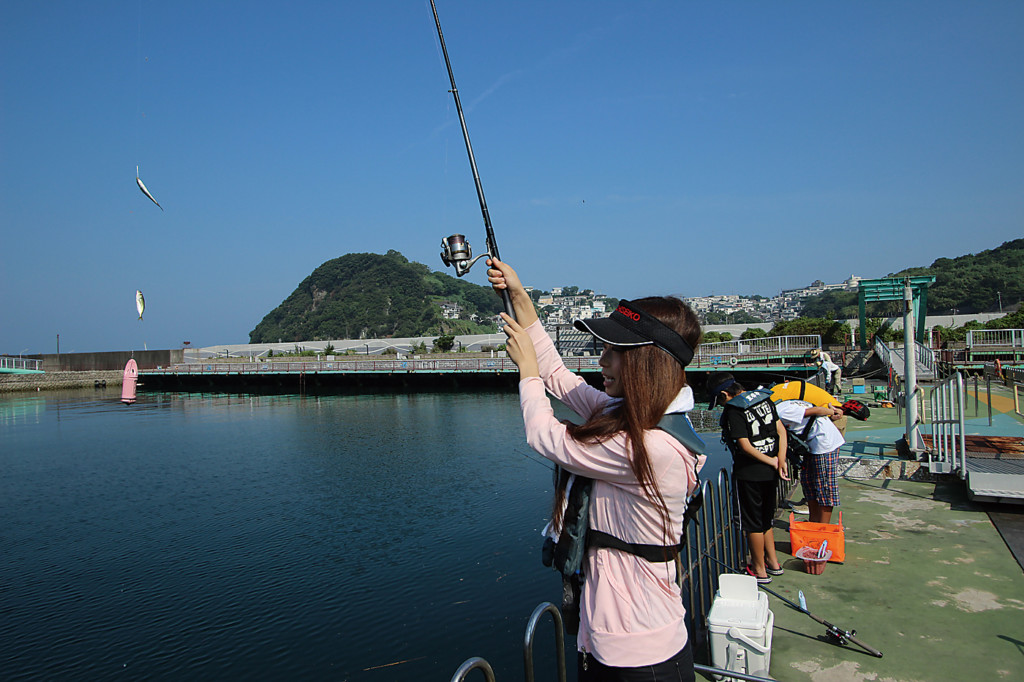
竿先に反応があれば合わせずにリールを巻いて上げる
すいこみバケツがあれば、エサを詰める作業がかなり楽チンになる。使い方は以下の動画を参考にしてほしい。
参考動画
サビキ釣りの参考になりそうな動画をいくつかピックアップしてみました。
捌き方はこちらをご参考ください。
2020年10月28日水曜日
Telloで遊び(pythonからディープラーニング(Deep Learning)へ)
Telloで遊び(pythonからディープラーニング(Deep Learning)へ)
新品価格
¥460から
(2020/10/28 14:22時点)

新品価格
¥460から
(2020/10/28 14:22時点)
■基本コマンド
https://drone-an.pro/tellosdk_trans/04_tello_commands/
コントロールコマンド
| Command | Description | Possible Response | 説明 |
| Command | Enter SDK mode. | ok / error | SDKモードを開始 |
| takeoff | Auto takeoff. | ok / error | 離陸 |
| land | Auto landing. | ok / error | 着陸 |
| streamon | Enable video stream. | ok / error | ビデオストリームを有効に |
| streamoff | Disable video stream. | ok / error | ビデオストリームを無効に |
| emergency | Stop motors immediately. | ok / error | 即座にモーター停止 |
| up x | Ascend to “x” cm. x = 20-500 | ok / error | 20~500cmの間で上昇 |
| down x | down “x” Descend to “x” cm. x = 20-500 | ok / error | 20~500cmの間で下降 |
| left x | Fly left for “x” cm. “x” = 20-500 | ok / error | 20~500cmの間で左へ飛行 |
| right x | Fly right for “x” cm. “x” = 20-500 | ok / error | 20~500cmの間で右へ飛行 |
| forward x | Fly forward for “x” cm. “x” = 20-500 | ok / error | 20~500cmの間で前へ飛行 |
| back x | Fly backward for “x” cm. “x” = 20-500 | ok / error | 20~500cmの間で後ろへ飛行 |
| cw x | Rotate “x” degrees clockwise. “x” = 1-360 | ok / error | 時計回りに1~360度回転 |
| ccw x | Rotate “x” degrees counterclockwise. “x” = 1-360 | ok / error | 反時計回りに1~360度回転 |
| flip x | Flip in “x” direction. “l” = left “r” = right “f” = forward “b” = back | ok / error | 反転 |
| go x y z speed | Fly to “x” “y” “z” at “speed” (cm/s). “x” = -500-500 “y” = -500-500 “z” = -500-500 “speed” = 10-100 Note: “x”, “y”, and “z” values can’t be set between -20 – 20 simultaneously. | ok / error | 指定した「スピード」(cm / s)で「x」、「y」、「z」の順に飛行。 “ x” = -500-500 “ y” = -500-500 “ z” = -500-500 “スピード” = 10-100 注:「x」、「y」、「z」の値は、-20〜20の範囲で同時に設定することはできません。 |
| stop | Hovers in the air. Note: works at any time. | ok / error | 空中で浮かぶ。 注:いつでも機能します。 |
| curve x1 y1 z1 x2 y2 z2 speed | Fly at a curve according to the two given coordinates at “speed” (cm/s). If the arc radius is not within a range of 0.5-10 meters, it will respond with an error. “x1”, “x2” = -500-500 “y1”, “y2” = -500-500 “z1”, “z2” = -500-500 “speed” = 10-60 Note: “x”, “y”, and “z” values can’t be set between -20 – 20 simultaneously. | ok / error | 与えられた2つの座標に従って、指定した「スピード」(cm / s)でカーブしながら飛ぶ。 円弧の半径が0.5〜10メートルの範囲内にない場合は、エラーで応答する。 “ x1”、“ x2” = -500-500“ y1”、“ y2” = -500-500“ z1”、“ z2” = -500-500“ speed” = 10-60 注:「x」、「y」、「z」の値は、-20〜20の範囲で同時に設定することはできません。 |
| go x y z speed mid | Fly to the “x”, “y”, and “z” coordinates of the Mission Pad. “mid” = m1-m8 Note: “x”, “y”, and “z” values can’t be set between -20 – 20 simultaneously. | ok / error | Mission Padの “x”、 “y”、 “z”座標へ飛ぶ。 “mid” = m1 – m8 注:「x」、「y」、「z」の値は、-20〜20の範囲で同時に設定することはできません。 |
| curve x1 y1 z1 x2 y2 z2 speed mid | Fly at a curve according to the two given coordinates of the Mission Pad ID at “speed” (cm/s). If the arc radius is not within a range of 0.5-10 meters, it will respond with an error. “x1”, “x2” = -500-500 “y1”, “y2” = -500-500 “z1”, “z2” = -500-500 “speed” = 10-60 Note: “x”, “y”, and “z” values can’t be set between -20 – 20 simultaneously. | Mission Pad IDの2つの与えられた座標に従って、指定した「スピード」(cm / s)でカーブしながら飛ぶ。 円弧の半径が0.5〜10メートルの範囲内にない場合は、エラーで応答します。 “ x1”、“ x2” = -500-500 “ y1”、“ y2” = -500-500 “ z1”、“ z2” = -500-500 “ speed” = 10-60 注:「x」、「y」、「z」の値は、-20〜20の範囲で同時に設定することはできません。 | |
| jump x y z speed yaw mid1 mid2 | Fly to coordinates “x”, “y”, and “z” of Mission Pad 1, and recognize coordinates 0, 0, “z” of Mission Pad 2 and rotate to the yaw value. “mid” = m1-m8 “x” = -500-500 “y” = -500-500 “z” = -500-500 “speed” = 10-100 (cm/s) Note: “x”, “y”, and “z” values can’t be set between -20 – 20 simultaneously. | ok / error | Mission Pad 1の座標「x」、「y」、および「z」へ移動し、ミッションパッド2の座標「0」、「0」、「z」を認識し、ヨー値まで回転させます。 “mid” = m1 – m8 “ x” = -500-500 “ y” = -500-500 “ z” = -500-500 “スピード” = 10-100(cm / s) 注:「x」、「y」、「z」の値は、-20〜20の範囲で同時に設定することはできません。 |
設定コマンド
| Command | Description | Possible Response | 説明 |
| speed x | Set speed to “x” cm/s. x = 10-100 | ok / error | 速度を「x」cm / sに設定。 x = 10〜100 |
| rc a b c d | Set remote controller control via four channels. “a” = left/right (-100-100) “b” = forward/backward (-100-100) “c” = up/down (-100-100) “d” = yaw (-100-100) | ok / error | 4チャンネルでリモコンの制御を設定。 “ a” =左右(-100-100) “ b” =前方/後方(-100-100) “ c” =上方/下方(-100-100) “ d” =ヨー(-100-100) |
| wifi ssid pass | Set Wi-Fi password. ssid = updated Wi-Fi name pass = updated Wi-Fi password | ok / error | Wi-Fiパスワードを設定。 ssid =更新されたWi-Fi名 pass =更新されたWi-Fiパスワード |
| mon | Enable mission pad detection (both forward and downward detection). | ok / error | Mission Padの検出を有効に(前方と下方の両方の検出)。 |
| moff | Disable mission pad detection. | ok / error | Mission Padの検出を無効に。 |
| mdirection x | “x” = 0/1/2 0 = Enable downward detection only 1 = Enable forward detection only 2 = Enable both forward and downward detection Notes: Perform “mon” command before performing this command. The detection frequency is 20 Hz if only the forward or downward detection is enabled. If both the forward and downward detection are enabled, the detection frequency is 10 Hz. | ok / error | “ x” = 0/1/2 0 =下方検出のみを有効にする 1 =前方検出のみを有効にする 2 =前方検出と下方検出の両方を有効にするノート: このコマンドを実行する前に、「mon」コマンドを実行。前方または下方検出のみが有効になっている場合、検出周波数は20 Hzです。前方検出と下方検出の両方が有効になっている場合、検出周波数は10 Hzです。 |
| ap ssid pass | Set the Tello to station mode, and connect to a new access point with the access point’s ssid and password. ssid = updated Wi-Fi name pass = updated Wi-Fi password | ok / error | Telloをステーションモードに設定し、アクセスポイントのSSIDとパスワードを使用して新しいアクセスポイントに接続します。 ssid =更新されたWi-Fi名 pass =更新されたWi-Fiパスワード |
読み取りコマンド
| Command | Description | Possible Response | 説明 |
| speed? | Obtain current speed (cm/s). | “x” = 10-100 | 現在の速度(cm / s)を取得。 |
| battery? | Obtain current battery percentage. | “x” = 0-100 | 現在のバッテリーの割合(%)を取得。 |
| time? | Obtain current flight time. | “time” | 現在の飛行時間を取得。 |
| wifi? | Obtain Wi-Fi SNR. | “wifi” | 現在のWi-FiのS/N比(信号雑音比)を取得。 |
| sdk? | Obtain the Tello SDK version. | “sdk version” | Tello SDKのバージョンを取得 |
| sn? | Obtain the Tello serial number. | “serial number” | Telloのシリアルナンバーを取得 |
 ■バイナリーコマンドについて
https://qiita.com/mozzio369/items/a942a212c6b5d3fdeb48
フォーマット
Telloのコマンドフォーマットです。
| 0 | 1 ~ 2 | 3 | 4 | 5 ~ 6 | 7 ~ 8 | --- | N-1 ~ N |
|---|---|---|---|---|---|---|---|
| 先頭バイト | パケット長 | CRC8 | パケットタイプ | コマンドID | シーケンス番号 | データ | CRC16 |
先頭バイト
先頭バイトは 0xCC 固定です。
パケット長
パケット長は、バイト1~2の先頭13ビットで、下位3ビットは未使用(0)になります。テイクオフコマンドの場合は、データ部分がないのでパケット長は11バイトとなり、以下のようになります。
>>> hex(11<<3)
'0x58'
これをバイト1~2にリトルエンディアンで 0x58 0x00 と設定します。
以降、複数バイトからなるフィールドは、すべてリトルエンディアンです。
CRC8
バイト3は、先頭バイトからパケット長までの3バイトのCRC8です。ここでは先人の知恵をそのまま拝借して、テーブルを使って計算する方法を紹介します。
TBL_CRC8 = [
    0x00, 0x5e, 0xbc, 0xe2, 0x61, 0x3f, 0xdd, 0x83, 0xc2, 0x9c, 0x7e, 0x20, 0xa3, 0xfd, 0x1f, 0x41,
    0x9d, 0xc3, 0x21, 0x7f, 0xfc, 0xa2, 0x40, 0x1e, 0x5f, 0x01, 0xe3, 0xbd, 0x3e, 0x60, 0x82, 0xdc,
    0x23, 0x7d, 0x9f, 0xc1, 0x42, 0x1c, 0xfe, 0xa0, 0xe1, 0xbf, 0x5d, 0x03, 0x80, 0xde, 0x3c, 0x62,
    0xbe, 0xe0, 0x02, 0x5c, 0xdf, 0x81, 0x63, 0x3d, 0x7c, 0x22, 0xc0, 0x9e, 0x1d, 0x43, 0xa1, 0xff,
    0x46, 0x18, 0xfa, 0xa4, 0x27, 0x79, 0x9b, 0xc5, 0x84, 0xda, 0x38, 0x66, 0xe5, 0xbb, 0x59, 0x07,
    0xdb, 0x85, 0x67, 0x39, 0xba, 0xe4, 0x06, 0x58, 0x19, 0x47, 0xa5, 0xfb, 0x78, 0x26, 0xc4, 0x9a,
    0x65, 0x3b, 0xd9, 0x87, 0x04, 0x5a, 0xb8, 0xe6, 0xa7, 0xf9, 0x1b, 0x45, 0xc6, 0x98, 0x7a, 0x24,
    0xf8, 0xa6, 0x44, 0x1a, 0x99, 0xc7, 0x25, 0x7b, 0x3a, 0x64, 0x86, 0xd8, 0x5b, 0x05, 0xe7, 0xb9,
    0x8c, 0xd2, 0x30, 0x6e, 0xed, 0xb3, 0x51, 0x0f, 0x4e, 0x10, 0xf2, 0xac, 0x2f, 0x71, 0x93, 0xcd,
    0x11, 0x4f, 0xad, 0xf3, 0x70, 0x2e, 0xcc, 0x92, 0xd3, 0x8d, 0x6f, 0x31, 0xb2, 0xec, 0x0e, 0x50,
    0xaf, 0xf1, 0x13, 0x4d, 0xce, 0x90, 0x72, 0x2c, 0x6d, 0x33, 0xd1, 0x8f, 0x0c, 0x52, 0xb0, 0xee,
    0x32, 0x6c, 0x8e, 0xd0, 0x53, 0x0d, 0xef, 0xb1, 0xf0, 0xae, 0x4c, 0x12, 0x91, 0xcf, 0x2d, 0x73,
    0xca, 0x94, 0x76, 0x28, 0xab, 0xf5, 0x17, 0x49, 0x08, 0x56, 0xb4, 0xea, 0x69, 0x37, 0xd5, 0x8b,
    0x57, 0x09, 0xeb, 0xb5, 0x36, 0x68, 0x8a, 0xd4, 0x95, 0xcb, 0x29, 0x77, 0xf4, 0xaa, 0x48, 0x16,
    0xe9, 0xb7, 0x55, 0x0b, 0x88, 0xd6, 0x34, 0x6a, 0x2b, 0x75, 0x97, 0xc9, 0x4a, 0x14, 0xf6, 0xa8,
    0x74, 0x2a, 0xc8, 0x96, 0x15, 0x4b, 0xa9, 0xf7, 0xb6, 0xe8, 0x0a, 0x54, 0xd7, 0x89, 0x6b, 0x35,
]

def calc_crc8(buf, size):
    i = 0
    seed = 0x77
    while size > 0:
        seed = TBL_CRC8[(seed ^ buf[i]) & 0xff]
        i = i + 1
        size = size - 1
    return seed

buf = bytearray()
for b in cmd[:3]:
    buf.append(b)

crc8 = calc_crc8(buf, len(buf))
パケットタイプ・コマンドID
バイト4はパケットタイプです。バイト5~6はコマンドIDです。離着陸およびジョイスティックに関するコマンドは以下です。
| Command | Packet Type | Command ID |
|---|---|---|
| Takeoff | 0x68 (104) | 0x54 (84) |
| Land | 0x68 (104) | 0x55 (85) |
| Stick (Timestamp) | 0x60 (96) | 0x50 (80) |
他にもたくさんのコマンドがあります。
The Packet Type dictates the structure of the Payload (if there is one). Subtype seems to be always zero.
Here are the currently known message IDs. Click on the function for further details.
| Value | Meaning |
|---|---|
| 0 | Extended |
| 1 | Get Info |
| 2 | Data 1 |
| 4 | Data 2 |
| 5 | Set Info |
| 6 | Flip |
| (3 & 7) | Unknown |
Here are the currently known message IDs. Click on the function for further details.
| ID (Hex) | Tello Function | Dir | Comments |
|---|---|---|---|
| 0x0001 | Connect | → | Psuedo-command sent as plain-text |
| 0x0002 | Connected | ← | Psuedo-command received as plain-text |
| 0x0011 | Query SSID | ↔ | |
| 0x0012 | Set SSID | → | |
| 0x0013 | Query SSID Password | → | |
| 0x0014 | Set SSID Password | → | |
| 0x0015 | Query Wifi Region | → | |
| 0x0016 | Set Wifi Region | → | |
| 0x001a | Wifi Strength | ← | Seems to max. out at 90% |
| 0x0020 | Set Video Bit-Rate | → | |
| 0x0021 | Set Video Dyn. Adj. Rate | → | |
| 0x0024 | Set EIS | → | |
| 0x0025 | Request Video Start | → | |
| 0x0028 | Query Video Bit-Rate | ↔ | (Unverified) |
| 0x0030 | Take Picture | ↔ | Can also be a response |
| 0x0031 | Set Video Aspect | ↔ | |
| 0x0032 | Start Recording | → | |
| 0x0034 | Exposure Values | ||
| 0x0035 | Light Strength | ← | Sent by drone approx every 2 secs |
| 0x0037 | Query JPEG Quality | → | |
| 0x0043 | Error 1 | ← | |
| 0x0044 | Error 2 | ← | |
| 0x0045 | Query Version | ↔ | |
| 0x0046 | Set Date & Time | ↔ | |
| 0x0047 | Query Activation Time | → | |
| 0x0049 | Query Loader Version | → | |
| 0x0050 | Set Sticks | → | Tello needs these regularly as a 'heartbeat' |
| 0x0054 | Take Off | ↔ | Normal take-off and climb to approx. 1.8m agl |
| 0x0055 | Land | ↔ | |
| 0x0056 | Flight Status | ← | Not all fields are set |
| 0x0058 | Set Height Limit | → | |
| 0x005c | Flip | → | |
| 0x005d | Throw Take Off | → | |
| 0x005e | Palm Land | → | |
| 0x0062 | File Size | ← | eg. for chunk of photo |
| 0x0063 | File Data | ← | eg. chunk of photo |
| 0x0064 | File Done | ← | a.k.a. EOF. eg. end of photo data |
| 0x0080 | Start Smart Video | → | |
| 0x0081 | Smart Video Status | ← | |
| 0x1050 | Log Header | ↔ | |
| 0x1051 | Log Data | ← | |
| 0x1052 | Log Config. | ← | |
| 0x1053 | Bounce | → | Toggles the Bounce flight mode |
| 0x1054 | Calibration | ↔ | Payload (1 byte): 0 to calibrate IMU, 1 to calibrate Center of Gravity (should be hovering) |
| 0x1055 | Set Low Battery Threshold | ↔ | Certain commands are ignored below the threshold |
| 0x1056 | Query Height Limit | ↔ | |
| 0x1057 | Query Low Battery Threshold | ↔ | |
| 0x1058 | Query Attitude (Limit?) | → | |
| 0x1059 | Set Attitude (Limit?) | → |
シーケンス番号
バイト7~8はシーケンス番号です。基本的にインクリメントですが、Stick (Timestamp)コマンドや、H.264ビデオストリームのデコードに必要なSPS/PPSリクエストコマンドなど、一部のコマンドは常時0になります。
データ
Takeoffコマンドでは、データ部分はありません。
Landコマンドではデータは0x00の1バイトです。
Stick (Timestamp)では6バイトのジョイスティック情報と5バイトのタイムスタンプ情報が付きます。
ジョイスティック情報の6バイト=48ビットのうち、最初の4ビットは fast (1) か normal(0) かのモード設定です。残りの44ビットがジョイスティックの操作に割り当てられています。
| b1 ~ b4 | b5 ~ b15 | b16 ~ b26 | b27 ~ b37 | b38 ~ b48 |
|---|---|---|---|---|
| mode | yaw (回転) | throttle (上下) | pitch (前後) | role (左右) |
ジョイスティックの操作は、何もしない場合が1024で、±660の範囲で設定されます。例えば normalモードで、ジョイスティックを何も操作しないホバリング状態の場合は以下のようになります。
| b1 ~ b4 | b5 ~ b15 | b16 ~ b26 | b27 ~ b37 | b38 ~ b48 |
|---|---|---|---|---|
| 0000 | 10000000000 | 10000000000 | 10000000000 | 10000000000 |
バイト単位で表すと0x08 0x01 0x00 0x20 0x04 0x00 となり、これをバイト9~14にリトルエンディアンで設定します。
タイムスタンプ情報は、時(1バイト)、分(1バイト)、秒(1バイト)、ミリ秒(2バイト)の計5バイトです。
これらをまとめると、Stick (Timestamp)コマンドは以下のように作成できます(最後のCRC16を除く)。
import datetime
cmd = [0xcc, 0xb0, 0x00, 0x7f, 0x60, 0x50, 0x00, 0x00, 0x00] # 先頭バイトからシーケンス番号までの部分
mode = 0
yaw = 1024
thr = 1024
pitch = 1024
roll = 1024
stick_data = (mode<<44) + (yaw<<33) + (thr<<22) + (pitch<<11) + roll
for i in range(0,6):
    cmd.append(stick_data>>(8*i) & 0xff)
now = datetime.datetime.now()
h = now.hour
m = now.minute
s = now.second
ms = round(now.microsecond / 1000)
cmd.append(h)
cmd.append(m)
cmd.append(s)
cmd.append(ms & 0xff)
cmd.append(ms >> 8)
CRC16
最後の2バイトはCRC16です。こちらもCRC8と同様、先人の知恵をそのまま拝借します。下記で計算したCRC16を最後の2バイトに追加して、コマンドの完成です。
# CTC16 Table
TBL_CRC16 = [
    0x0000, 0x1189, 0x2312, 0x329b, 0x4624, 0x57ad, 0x6536, 0x74bf, 0x8c48, 0x9dc1, 0xaf5a, 0xbed3, 0xca6c, 0xdbe5, 0xe97e, 0xf8f7,
    0x1081, 0x0108, 0x3393, 0x221a, 0x56a5, 0x472c, 0x75b7, 0x643e, 0x9cc9, 0x8d40, 0xbfdb, 0xae52, 0xdaed, 0xcb64, 0xf9ff, 0xe876,
    0x2102, 0x308b, 0x0210, 0x1399, 0x6726, 0x76af, 0x4434, 0x55bd, 0xad4a, 0xbcc3, 0x8e58, 0x9fd1, 0xeb6e, 0xfae7, 0xc87c, 0xd9f5,
    0x3183, 0x200a, 0x1291, 0x0318, 0x77a7, 0x662e, 0x54b5, 0x453c, 0xbdcb, 0xac42, 0x9ed9, 0x8f50, 0xfbef, 0xea66, 0xd8fd, 0xc974,
    0x4204, 0x538d, 0x6116, 0x709f, 0x0420, 0x15a9, 0x2732, 0x36bb, 0xce4c, 0xdfc5, 0xed5e, 0xfcd7, 0x8868, 0x99e1, 0xab7a, 0xbaf3,
    0x5285, 0x430c, 0x7197, 0x601e, 0x14a1, 0x0528, 0x37b3, 0x263a, 0xdecd, 0xcf44, 0xfddf, 0xec56, 0x98e9, 0x8960, 0xbbfb, 0xaa72,
    0x6306, 0x728f, 0x4014, 0x519d, 0x2522, 0x34ab, 0x0630, 0x17b9, 0xef4e, 0xfec7, 0xcc5c, 0xddd5, 0xa96a, 0xb8e3, 0x8a78, 0x9bf1,
    0x7387, 0x620e, 0x5095, 0x411c, 0x35a3, 0x242a, 0x16b1, 0x0738, 0xffcf, 0xee46, 0xdcdd, 0xcd54, 0xb9eb, 0xa862, 0x9af9, 0x8b70,
    0x8408, 0x9581, 0xa71a, 0xb693, 0xc22c, 0xd3a5, 0xe13e, 0xf0b7, 0x0840, 0x19c9, 0x2b52, 0x3adb, 0x4e64, 0x5fed, 0x6d76, 0x7cff,
    0x9489, 0x8500, 0xb79b, 0xa612, 0xd2ad, 0xc324, 0xf1bf, 0xe036, 0x18c1, 0x0948, 0x3bd3, 0x2a5a, 0x5ee5, 0x4f6c, 0x7df7, 0x6c7e,
    0xa50a, 0xb483, 0x8618, 0x9791, 0xe32e, 0xf2a7, 0xc03c, 0xd1b5, 0x2942, 0x38cb, 0x0a50, 0x1bd9, 0x6f66, 0x7eef, 0x4c74, 0x5dfd,
    0xb58b, 0xa402, 0x9699, 0x8710, 0xf3af, 0xe226, 0xd0bd, 0xc134, 0x39c3, 0x284a, 0x1ad1, 0x0b58, 0x7fe7, 0x6e6e, 0x5cf5, 0x4d7c,
    0xc60c, 0xd785, 0xe51e, 0xf497, 0x8028, 0x91a1, 0xa33a, 0xb2b3, 0x4a44, 0x5bcd, 0x6956, 0x78df, 0x0c60, 0x1de9, 0x2f72, 0x3efb,
    0xd68d, 0xc704, 0xf59f, 0xe416, 0x90a9, 0x8120, 0xb3bb, 0xa232, 0x5ac5, 0x4b4c, 0x79d7, 0x685e, 0x1ce1, 0x0d68, 0x3ff3, 0x2e7a,
    0xe70e, 0xf687, 0xc41c, 0xd595, 0xa12a, 0xb0a3, 0x8238, 0x93b1, 0x6b46, 0x7acf, 0x4854, 0x59dd, 0x2d62, 0x3ceb, 0x0e70, 0x1ff9,
    0xf78f, 0xe606, 0xd49d, 0xc514, 0xb1ab, 0xa022, 0x92b9, 0x8330, 0x7bc7, 0x6a4e, 0x58d5, 0x495c, 0x3de3, 0x2c6a, 0x1ef1, 0x0f78
]

def calc_crc16(buf, size):
    i = 0
    seed = 0x3692
    while size > 0:
        seed = TBL_CRC16[(seed ^ buf[i]) & 0xff] ^ (seed >> 8)
        i = i + 1
        size = size - 1
    return seed

buf = bytearray()
for b in cmd[:len(cmd)-2]:
    buf.append(b)

crc16 = calc_crc16(buf, len(buf))
登録:
投稿 (Atom)